
I have had lots of people ask me to show them how I bind quilts (and other smaller projects) so I thought it was time I took some pictures and videos of my process and share it here!

This tutorial covers making your binding, sewing them into one long strip, pressing your binding and then attaching it by machine to the front of your quilt. A second tutorial will be for how to hand sew your binding down onto the back of your quilt.
Let’s get started! (You can also go straight to my Youtube channel and watch the videos in order there https://www.youtube.com/channel/UCiWZLJEZ2HBe_r_6m-LNEng )
Cutting Your Strips
I cut my strips at 2.25″ by whatever the width of the fabric is (full width of a bolt or just the width of a FQ if I am going scrappy). I have found that unless my batting is very thick, a 2.25″ binding strip is just the right size when I fold it over to the back to sew down 🙂

Once you have the number of strips cut that your pattern has specified, take the first two and place one right side up, and the other right side facing it and at right angles just like in the image below.

You can then mark (with something that can be removed is best) in a diagonal line across the corner. Make sure your fabric is in a little bit on both the top and right sides so that any selvedges are going to be cut off and not included in your lovely binding strip 🙂
When you are first starting out, it might also be handy to pin either side of that line so your fabric doesn’t move as you sew.
You can now sew across that line and then watch this video below to show you how to sew the next strip and the next and then cut them apart.
Then we can take your big long strip to the ironing board and press it.
You will then have a nicely folded big long strip of binding.

I like to wind mine around my Binding Betty or one of my vintage bobbins until I am ready to sew it onto my project

Attaching the Binding
Now that we have our binding in one big long strip, we can start attaching it to our quilt.
I put my walking foot onto my machine to assist with all the layers moving through smoothly and easily. It is possible to do it without a walking foot, but you may get puckers and you may need to help ease it through the machine with your hand.
I also pop on my quilting glove to help me hang on to the quilt (mine has a habit of falling off the sewing table!) Actually, they aren’t actually quilting gloves at all, they are just $3 gloves from Daiso and they work a treat!
I start in the top right hand corner of the front of the quilt, about 10″ down from the top. But I leave another 8″ of binding strip loose as a tail and therefore only start sewing about 18″ down from the top corner.

Place your binding with the raw edge matching to the edge of your quilt. Then sew a 1/4″ seam from that edge. Watch this video for a visual explanation.
Turning Corners on your Binding
Turning corners isn’t difficult, just take your time. We stop sewing 1/4″ before the corner and either sew a locking stitch if your machine has one, or a few stitches in reverse and then cut your thread.

Now watch the video for how to fold the fabric to turn the corner.
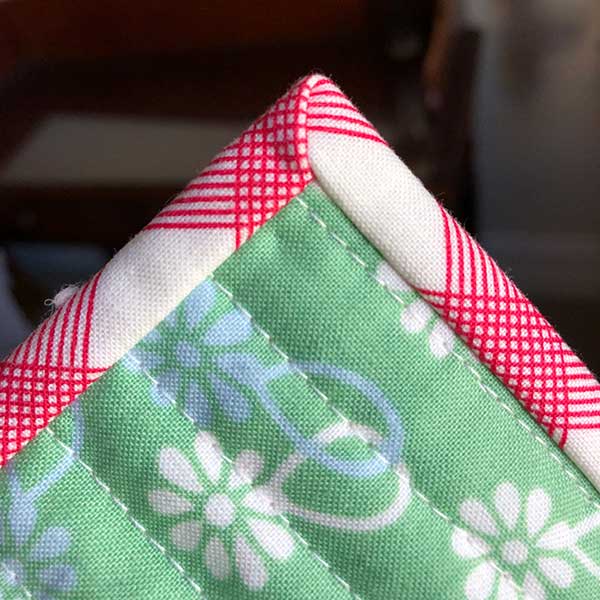
And this is what your corner will look like once it is all finished and sewn down onto the back as well!
Continue on attaching your binding all the way around your quilt until you have just turned the last corner.
Stop just an inch or so down from that last corner and then watch this video on how to attach the end of the binding back to the beginning so that nobody will ever be able to pick where you have started and stopped your binding!
You will now have your binding all attached to the front of your quilt, I like to give it a quick press back away from the quilt. This helps on the next step which is hand sewing your binding around on to the back of your quilt.

I will do another blog post and videos another day to show you how I go about hand sewing my binding onto the back side of the quilt. This is what it looks like when that is done!

Before you know it you will be a whizz at binding your quilts!
And continue on with the Binding Tutorial – Part 2.


Thank you so much for this post and video to show the close up details! I’ve always fought with joining the two ends to make a smooth seam. Your method makes total sense and now I look forward to trying it out. You’ve made my day!