The Moda Block Patterns are well written and once you are used to seeing how they are laid out you shouldn’t have any problems. But there are a few things I wanted to tell you about before we start our sewalong.

Your Expectations
Making one block a day is pretty ambitious… for most of us that just isn’t possible. You know, coz life! So don’t stress! Save the daily patterns into a folder on your computer, pop them onto your ipad or even print them out. Choose your fabrics for a block. Cut them out when you have a chance, sew when you are able.
It is surprising how much you can achieve when you fit in even 5 minutes here and there 🙂
Half Square Triangles (HSTs)
Where possible I modified my cutting slightly to make HSTs my normal way…. by putting two squares together, drawing a line diagonally from corner to corner and sewing a scant 1/4″ seam either side. Cutting down the drawn line, pressing to the darker fabric and then trimming to correct size with my Bloc Loc ruler.
So when the pattern says cut a square 2 7/8″ and cut diagonally in half from corner to corner to make two triangles and then sew those triangles to a different coloured triangles cut the same way, I ignored that. Rounded up to the nearest half inch (in this case to 3″ square) and used my method. This meant I was sewing less ‘on the bias’ seams 🙂 and gave me a bit of leeway to trim to size if my seam allowance wasn’t quite right.
Pressing Instructions
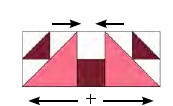
Each block has pressing instruction either written or displayed with little arrows on the diagrams. These have been pretty good! I followed them almost everywhere (except a few times I chose to press open to save a little bit of bulk) and if you follow them too they will definitely help your blocks press better.
Fabric Choices
For each block I worked out which fabric I was cutting for each alphabet letter in the cutting instructions and wrote it on the paper (yes, I printed each block out! I normally wouldn’t to save paper but I wanted to get all my thoughts and notes down so I could share them with you!)
I numbered each of my fat quarters of fabric from 1 – 20.
Quarter Inch Seam
Double check your quarter inch seam allowance before you start. Cut three scrap pieces of fabric 1.5″ wide and about 3″ long. Sew them together on the 3″ sides. The middle piece once sewn and pressed should be exactly 1″ wide. If not, adjust where you are sewing your 1/4″ seam allowance a little and repeat until the middle piece is exactly 1″. You are ready to start sewing some accurate blocks!